
You can implement Personalization using the REST API and the Search UI Library. For further information and detailed instructions, please continue reading below.
Preparing the data
To leverage personalization, it’s essential to have structured data indexed with custom fields. Custom fields might represent product categories, seasonal attributes, or any other property that can capture user preferences. The most straightforward method to include custom fields is by utilizing meta tags on your web pages. Below is an example of a custom field defined using metatags:
<meta name="addsearch-custom-field" data-type="text" content="category=Digital product" />
When a user clicks on a product within this category, they will subsequently see more digital products in their personalized results. It’s important to note that for personalization to function, custom fields must be of the TEXT type.
To explore further about custom fields and their various applications, check out this supporting article.
Implementation
The implementation process depends on the installation method utilized. Personalization is currently supported through custom implementations using the REST API and Search UI Library.
The cookies created by the AddSearch UI and client libraries are considered 1st-party cookies because they are set by and directly related to your website, not by a third party.
Search UI Library
To add personalization to your Search UI implementation, follow these steps:
- Enable personalization tracking and set the expiration date for the cookie.
This doesn’t enable using cookies by itself, so you can keep personalization enabled if you use it in your implementation.
// Defaults - isEnabled: false, expirationDates: 180
client.enablePersonalizationTracking(false, 180);
- Consent to store the AddSearch user token in a cookie
By default, user token storage is disabled. If the user has already consented to cookies or you store cookies unless their usage is explicitly denied, set this to true. Once the user consented to cookies or declined them, you need to call this method once again with the updated value.
// Default: false
client.consentAddSearchCookie(true);
AddSearch’s cookie can be classified as a functional/analytics cookie. A user token is generated and saved in a cookie named “addsearchUserToken”.
- Set the user token
You need to set the user token by extracting it from the cookie or user’s session and passing to the client.
client.setUserToken(client.getUserTokenInPersonalization());
- Using your own user token (optional)
If you want to use your own token instead of the one generated by AddSearch, you need to call these functions:
client.setUserToken(yourUserToken);
client.setStatsSessionId(yourUserToken);
REST API
To implement personalization with the REST API, follow these steps:
- Assign a unique identifier (token) to each user who visits the website.
These tokens are typically stored in cookies. You might already have such a token in place, in this case you can just use it. For instance, if you have Google Analytics integrated on your website, such a token is stored inside the _ga cookie. If you implement user tokens from scratch, you need to make sure your website visitors consent to personalisation cookies usage.
- Include the user’s token in the Search API request as a GET parameter when they perform a search
For instance:
- When a user clicks a search result, pass their token within the session parameter of the Analytics API click event
For instance:
{
  "action": "click",
  "session": "test_user",
  "keyword": "personalisation",
  "docid": "abc123",
  "position": 1
}
- When establishing a cookie for storing a personalization token, remember to set the expiration date according to your privacy policy
Configuration
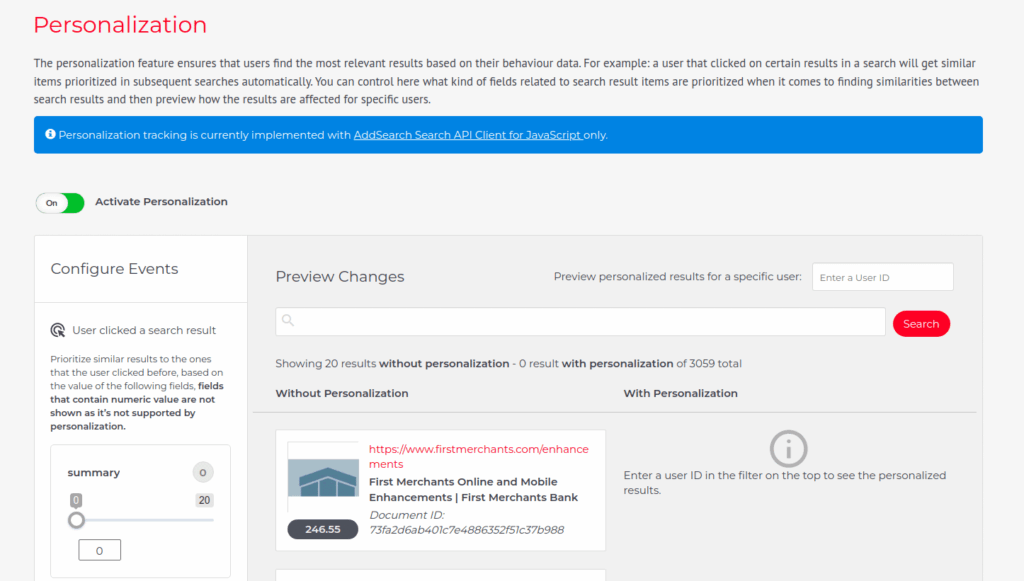
With custom fields indexed and personalization integrated into your setup, the next step involves configuration in the dashboard. Navigate to the Personalization section in your AddSearch dashboard and enable the feature. Select a custom field for personalization and assign its weight. We suggest starting with smaller values below 100 and tweaking them in the testing phase.
Testing
After setting up personalization, here’s how to test it:
- Visit your search page or widget and perform a search using a keyword
- Click a search result tagged with the custom field you’ve designated for personalization
- Open your web browser’s Developer Tools by right-clicking on the webpage and selecting ‘Inspect’, or by pressing Ctrl+Shift+I (on Windows/Linux) or Cmd+Option+I (on macOS)
- Switch to the ‘Application’ tab, locate the addsearchUserToken cookie, and copy its value
- Paste the token into the “Preview personalized results for a specific user” field in the dashboard to view personalized results on the right