
In this article, we will go through the components you need to create search suggestions autocomplete with the Search UI Library.
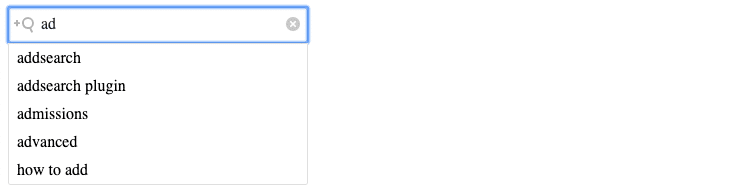
Search suggestions autocomplete helps users get the search query right by autocompleting suggested keywords under the search field. Search suggestions autocomplete is useful especially in mobile use as the user can pick an autocompleted suggestion after each typed character.
Creating the search view consists of:
- including the dependencies
- adding the containers where the components are created
- creating Javascript client and Search UI Library instances
- creating components and starting the Search UI Library
Please note that this tutorial requires familiarity with HTML and JavaScript.
1. Include the dependencies
To include the functionalities and the styles for the search view, we need to include dependencies for the Javascript Client and the Search UI Library.
<script src="https://cdn.jsdelivr.net/npm/[email protected]/dist/addsearch-js-client.min.js"></script>
<script src="https://cdn.jsdelivr.net/npm/[email protected]/dist/addsearch-search-ui.min.js"></script>
<link rel="stylesheet" href="https://cdn.jsdelivr.net/npm/[email protected]/dist/addsearch-search-ui.min.css" />
Please note that you should always use the latest version of the Search UI Library to ensure you have the latest features and bug fixes at your disposal. Visit the Search UI Library repository pages at GitHub to check out the change history.
2. Add the containers
The search suggestions autocomplete works together with the searchField, and the autocomplete components. They are created in the corresponding containers with the searchfield and autocomplete ids.
<!-- Containers. Search UI components will be added inside these divs -->
<div id="searchfield"></div>
<div id="autocomplete"></div>
3. Create the instances
To create a search view with the Search UI Library, you need to create an instance of the Javascript Client and the Search UI Library.
The AddSearch Javascript Client provides you access to the search index with the site key. The Search UI Library provides you with components you can use to create the search view.
  // AddSearch JS client with an example index. Get your own SITEKEY by signing up at www.addsearch.com
  var client = new AddSearchClient('2c32bf3eb06b30af5f8208481aea3e8b');

  var conf = {
    searchResultsPageUrl: '/search',
    updateBrowserHistory: false
  };

  // Search UI instance
  var searchui = new AddSearchUI(client, conf);
Here searchResultsPageUrl parameter points to the search results page where the user should be redirected after submitting the search query.
4. Create the components and start the Search UI Library
The search suggestions autocomplete view requires the searchField and the autocomplete components. Both components are assigned to their containers with containerId setting.
In the autocomplete component the sources array refers to data sources that determine what is returned when the user types characters in the search field.
The data sources support suggested keywords as well as search results. They can be displayed separately or together. For more information, visit the Search UI Library reference.
Please note that you need to enable Search suggestions from your AddSearch dashboard to search suggestions autocomplete functionality.
// Add components
searchui.searchField({
  containerId: 'searchfield',
  placeholder: 'Keyword..'
});

// Don't forget to set up Search Suggestions on AddSearch Dashboard first
searchui.autocomplete({
  containerId: 'autocomplete',
  sources: [
    {
      type: AddSearchUI.AUTOCOMPLETE_TYPE.SUGGESTIONS
    }
  ]
});

// All components added. Start
searchui.start();
Result
Check out the search suggestions autocomplete in action in here.