
The amount of information available on the internet and our websites is continuously growing. Few of us have the time or patience to manually dig through website navigations, and we rely on search engines and site search to find the information we need. It’s safe to say that search is becoming more popular and relevant than ever. Consequently, as a website owner, you need to get on board and offer users a way to quickly find information by adding search to your website.
How to Add Search Functionality in Your Website?
Now you’re probably wondering about how to actually do this – we’re here to help you get started! In this blog post, we’ll walk you through the process of adding a search bar to your website. To this end, we will share our experience of implementing site search and the typical steps required, from understanding what’s required, through figuring out how your search should work, to building your interface and customizing the results. What options do you have, and how can you choose the right solution to create a successful search for your website? Let’s find out!
Phase 1: Laying the foundation through research and goal setting
Just as with many things in life, it’s not always the smartest idea to cluelessly jump into action. Thus, starting the process of adding a search bar to your website requires you and your team to spend some time thinking, researching, and planning. Let’s discover what this entails!
AddSearch tip:
Adding a site search doesn’t have to be a massive project and can instead be a separate, smaller one. This means that you don’t need to wait for the next website redesign to be on your schedule – you can start adding or reworking your site search at any time.
What do your users need?
Above all, site search should help make your website a pleasant experience for your visitors. If you’ve already installed a search, review the corresponding analytics data to learn more about your users’ behavior. See if visitors find what they’re looking for, click on individual businesses-critical pages, get relevant search results, etc. If you don’t have site search data yet, work with personas to better understand your customers’ needs.
What does your company need?
Naturally, you also want to make sure that your site search helps you achieve your business goals. Depending on the type of company, website, and content you have, your goals may look different from those of others. For example, an e-commerce website should help sell more products. In contrast, a government website should assist people in finding forms and documents quickly. Therefore, the different goals also bring up the need for different solutions, functionalities, and looks. However, the main goal remains the same: making it as easy as possible to find content, which increases conversions regardless of the underlying purpose.
What is the current status?
If you already have a site search in place, make sure to analyze the data it provides. Find out what the current setup is doing well, what it could improve, and what doesn’t work. Read our blog post on measuring site search success to learn more!
Define goals for your site search
Now it’s time to combine your insights and define clear, measurable goals that site search should help you achieve. This step is essential as you will then have to derive the necessary search functionalities from your goals!
Look at this list of areas that site search can help improve for inspiration:
Site search increases:
- revenue
- conversion
- frequency of purchases
- length of visits
- engagement
Site search decreases:
- bounce rate
Do you already have a search bar on your website and want to check if you need to switch to a new solution? Then look at your goals and see if your tool can help you achieve them. Imagine one of your goals is to increase the monthly registrations for your Saas by X%. One way to accomplish this goal could be to promote the registration page in the search results.
Promoting business-critical pages can help achieve your goals:
 Ultimately, if you find that your current search solution doesn’t meet your needs, look for a tool that can help you achieve your goals.
AddSearch tip:
If you are worried about going through this process alone, do not hesitate to ask for help. For example, your sales, marketing, and SEO colleagues can typically be of great help when you need to analyze data and understand the behavior of your users.
After focusing your brainpower on analyzing and understanding your users’ behavior and defining your goals, you can start working on the user interface (UI) of your site search.
Phase 2: Define search functionality and its components
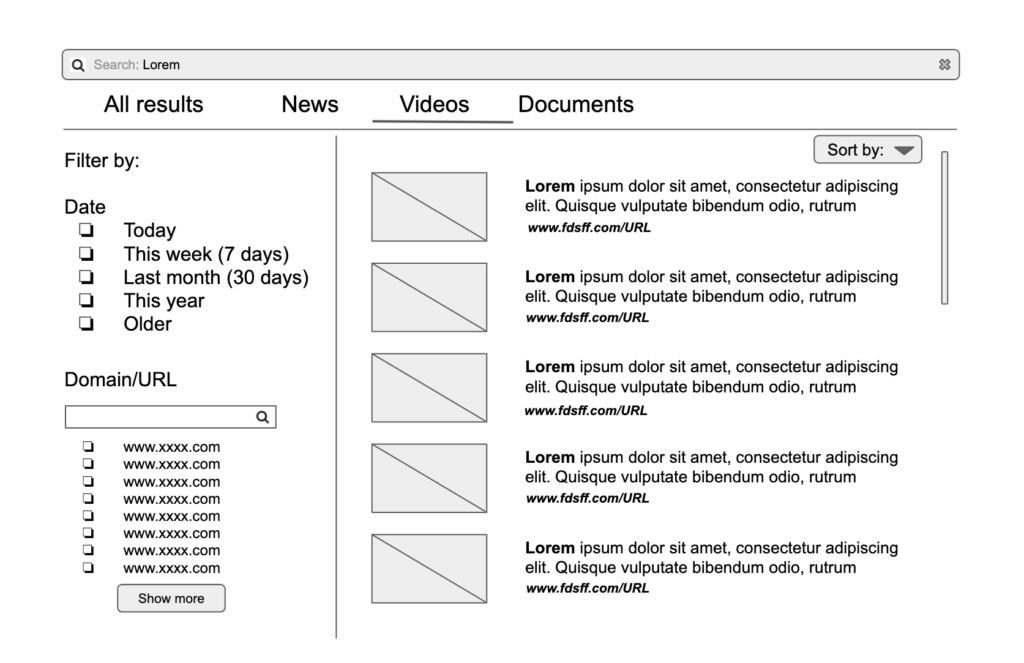
In this phase, you create wireframes of the UI and consider which functions must be available. Take all the information you gathered in the first phase and see what features can help meet your users’ needs and goals.
Using the wireframes, you and your team can understand how the site search works and how you can best present its functions. Here are some examples of what your wireframes could contain and clarify:
- What do search suggestions look like?
- How do you plan to showcase your most popular blog posts or products?
- What happens when the user clicks a particular button?
- Do you need an additional page to display search results?
Here’s what a wireframe could look like:
As you go through this process, you will regularly find yourself going back and forth between the wireframes and the data previously worked out. In this way, you can ensure that you incorporate all the knowledge gained in the first phase and create a suitable solution for your company!
After creating the wireframes for your ideal site search, you need to make sure that the searchable content contains the required data. For example, if you want users to filter their search results by price, the search software must be able to access and read the price data of your products.
Let’s talk about tech for a second
Above, we came across a crucial element of search: data. Different search solutions have different approaches to handling data. For example, some of them perform searches directly on your website’s database, while others work with a dedicated database optimized for search. You can find different solutions out there, all of which have their advantages and disadvantages.
If you plan to build everything from scratch, your programmers will need to find a productive and, in particular, performant solution for your search to access and process data. When you work with a tool like AddSearch, you can utilize a complete and proven tool that you don’t have to maintain and host yourself. You can learn more about the way we work and how we index your website’s data here.
AddSearch tip:
We have noticed two significant misunderstandings about the technical side of search implementation that are common and not necessarily true:
“Adding a site search to our website is difficult” – everything can be tricky if you don’t know what you’re doing. That’s why we’re here to help you understand how to successfully add a search bar to your website. We make sure to show you what’s possible, and that the things you initially deemed were difficult are actually quite simple when you work with the appropriate tools.
“Implementing site search looks easy, let’s do it ourselves” – in most cases, we don’t advise implementing a search engine yourself. Although DIY is a big trend, taking this path isn’t always the best decision. Especially when there are already robust solutions that are suitable for different use cases out there. First, do your research and check whether you can achieve the desired results with a pre-made tool or SaaS.
Phase 3: Create the UI and adjust search results
In the third phase, you implement the UI according to the wireframes. We recommend building a demo version that you don’t style or integrate into the website yet. As a result, you can look at the search independently, without distractions and see whether the outcome fits your expectations and requirements. This also makes it easier to concentrate on testing the search’s functionality and the logic behind it. Do filters work correctly? Do you get the correct search results?
If your site search solution lets you customize search results, this is also the right time to start tweaking. For example, you often want to have specific pages or whole categories and sections of your website higher up on the result page. You may also want to define search synonyms and general typing errors in your search solution so that users can always get relevant results. However, the possibilities you have for optimization depend on the tool you use.
Adjust the ranking of sections of your website and offer relevant results:

Let’s get back to building the user interface.
Of course, you have a variety of options for creating your search interface. If you are an AddSearch user, you can choose from several options:
Ready-made views
We offer a variety of ready-made views that can serve as an inspiration and help you get started. However, they are more one-size-fits-all solutions. Hence, if you want to achieve a 100% match with your website’s design and user interface, you have to create the search interface yourself.
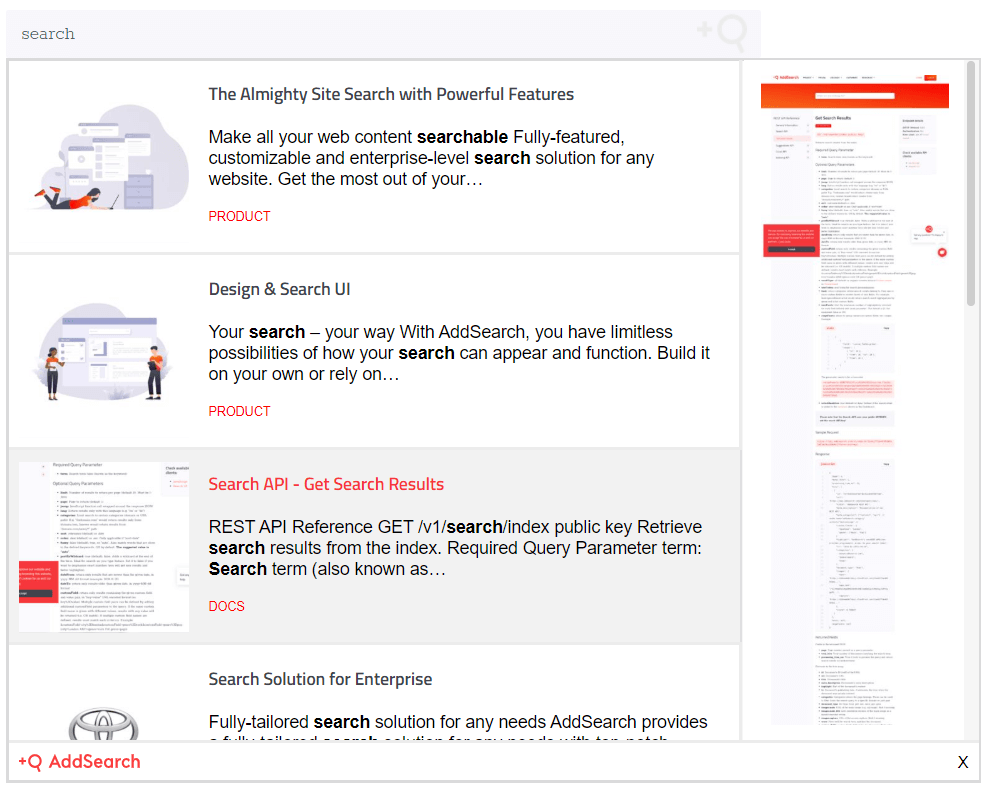
Basic widget view for displaying a search bar and search results:
Yet, ready-made views can still be a suitable choice to add a search function to your website if you’re satisfied with what they provide.
To use our views, install AddSearch, and integrate one of our ready-made code snippets to replace the current search with AddSearch. If you use a CMS like WordPress, you can install the AddSearch WordPress plugin and connect it to your AddSearch account.
With both variants, your search is automatically replaced by our ready-made search views, and you can get them up and running immediately.
Customizable search UI
We believe that the UI of your site search should always be tailored to its use case. As mentioned above, our ready-made views can work for you if they fit your design well and offer what you and your users need. In most cases, however, it’s better to tweak the design and layout a little – this is where our Search UI library comes in handy.
Using our search UI library, you can quite quickly implement a custom search. We recommend most customers opt for this solution, as it will help them to remain scalable and adaptable in the future. However, this implies that you also think about your site search in the long term. You will then probably find that the simple solution (with ready-made views) isn’t necessarily the best and sustainable.
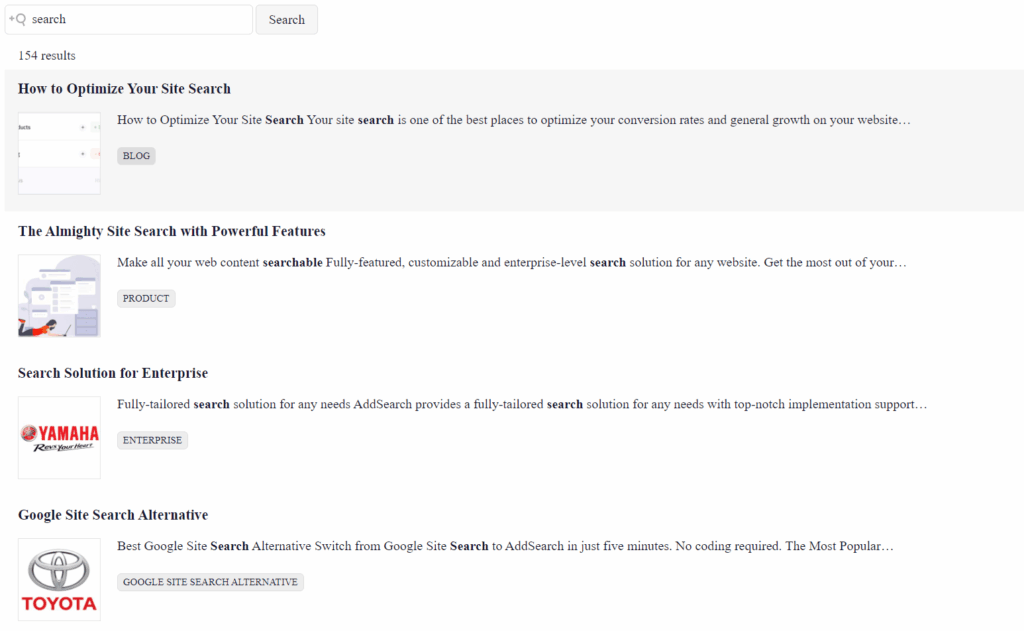
Example search implementation with our Search UI library without styling;
If you want even more freedom when building your site search, you can let your developers work directly with our Search APIs. However, this freedom also comes with new responsibilities, since you need to ensure that the UI you create works perfectly. We encourage you to read our documentation to learn more about our APIs.
Phase 4: Add search bar function to your website and style it
In the final phase, after making sure that everything works, you can integrate the search into your website and style it so that it looks as intended. Naturally, if you’ve chosen a pre-built user interface, your options may be limited. However, you should try to adapt it as much as possible to the design of your website. In the end, your website should provide visitors with a seamless experience, and each part should align well to the main UI and user experience (UX).
What to do next
Once you have completed the implementation project, you should regularly monitor the results and tweak the search UI to improve the user experience. Also, take some time to analyze the search data to see if it works as expected and delivers the desired results. To do this, also check your defined goals to find out more about your progress.
AddSearch tip:
Analyzing data and fiddling with metrics is a topic all on its own – especially if this isn’t your metier, you may be wondering how to work with search data. We hear you and have created the blog post “How to measure site search success” to get you started. At the end of the day, we hope this guide will help you achieve your envisioned results with site search!
Which solution is right for you?
Frankly, we can’t give you an answer to this question right off the bat. As pointed out several times throughout this blog post, what’s best for your users and your company depends on many factors. While some companies fare quite well with a one-size-fits-all solution, most get better results by creating a tailor-made site search.
Adding a search bar function to your website is easy if you don’t have any requirements or specifications set up. However, the results can hardly get you ahead. On the other hand, planning can often be the most challenging step in the entire process when you lack the experience. That being said, we strongly recommend that you spend some time analyzing and planning before you start building your website search. Then, many things will fall into place on their own.
Get the most out of your site search project by contacting an experienced site search specialist. This person can guide you through the process and help you find new and creative ways to improve the UX of your search.
Sounds good? Contact us to start your project, or register for a 7-day trial and get to know AddSearch.
